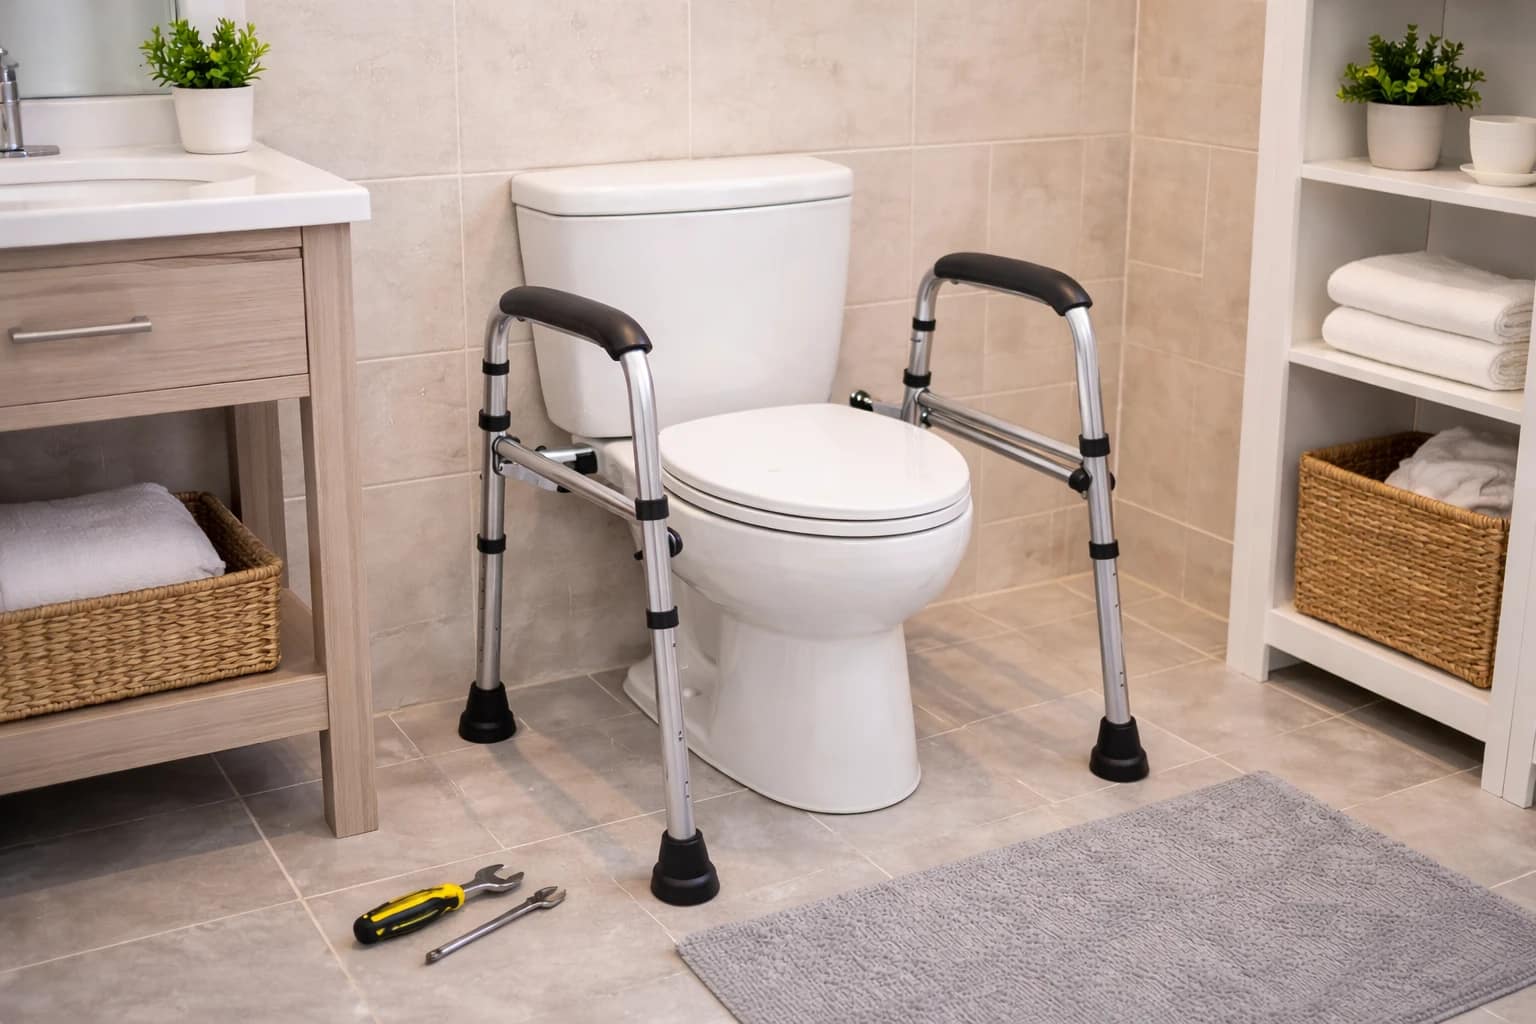
Learning how to install a toilet safety frame is easier than most people expect, especially since most models are designed for simple assembly and quick setup.
Unlike wall-mounted grab bars, toilet safety frames usually don’t require drilling into walls or complicated tools. Many models can be assembled and positioned around the toilet in just a few minutes.
However, correct setup still matters. If the frame isn’t adjusted properly or positioned evenly on the floor, it may feel unstable or uncomfortable to use.
This guide walks through the installation process step by step so you can set up a toilet safety frame safely and confidently.
In some situations, it also helps to compare toilet grab bars vs toilet safety frames to understand which option works best in tighter layouts.
Disclosure: As an Amazon Associate, I earn from qualifying purchases. This post may contain affiliate links. If you purchase through these links, I may earn a small commission at no extra cost to you. I only recommend products I would feel comfortable using in my own home. Learn more.
How to Install a Toilet Safety Frame
Installing a toilet safety frame usually involves four simple steps: assembling the frame, adjusting the height and width, positioning it around the toilet, and testing stability before use. Most freestanding models do not require tools or drilling, making installation quick and beginner-friendly.
- Assemble the frame
- Adjust the height and width
- Position the frame around the toilet
- Test stability before use
This process usually takes about 10-20 minutes for most standard frames.
Let’s go through each step in detail.
Step 1: Assemble the Frame
Most toilet safety frames arrive partially assembled in the box.
Inside the package you will typically find:
- Two arm supports
- Frame legs or base bars
- Locking pins or bolts
- Rubber feet for stability
Assembly usually involves connecting the side arms to the main frame using locking pins or bolts. Many models use push-button adjustment holes that allow the arms and legs to slide into position before locking securely.
Make sure all pins click firmly into place before moving to the next step.
A properly assembled frame should feel rigid and not wobble when lifted.
Step 2: Adjust the Height
Once the frame is assembled, adjust the height of the legs.
Most toilet safety frames have several height settings to accommodate different toilet heights and user preferences.
The correct height allows the user to:
- Rest their hands comfortably on the armrests while seated
- Push upward naturally when standing
As a general guideline, the armrests should sit roughly at or slightly above seat height.
If the frame is too low, it becomes harder to push up when standing.
If it is too high, it may feel awkward to grip.
Take a moment to sit on the toilet and test the armrest position before locking the adjustment pins.
Step 3: Adjust the Width (If the Frame Allows It)
Some toilet safety frames also allow width adjustment.
If your model includes adjustable arms:
- Measure the width of the toilet base
- Adjust the arms so they sit comfortably on each side
- Ensure both sides remain even and symmetrical
The goal is to create enough space for comfortable sitting while keeping the arms close enough to provide stable support.
In small bathrooms, slightly narrowing the frame can also help improve clearance around nearby walls or vanities, and exploring compact toilet safety frame options can make it easier to find models designed specifically for limited space.
Avoid narrowing the arms too much, which may make sitting down feel restricted.
Step 4: Position the Frame Around the Toilet
After adjusting the frame, place it around the toilet.
For freestanding models, the legs should rest on the floor on both sides of the toilet bowl.
Make sure:
- All four feet touch the floor evenly
- The frame is centered around the toilet
- The armrests are easy to reach when seated
If the floor is uneven, adjust the leg height slightly until the frame sits flat.
A properly positioned frame should feel balanced and stable.
Step 5: Test Stability Before Use
Before using the frame regularly, perform a quick stability test.
Place your hands on both armrests and press downward as if you were standing up.
Check for:
- Movement or shifting
- Uneven legs
- Loose pins or bolts
A properly installed frame should feel stable and secure when weight is applied. When pushing down on both armrests, the frame should not wobble, slide, or lift from the floor.
If the frame moves, recheck the height adjustments and floor contact points.
How to Install Toilet-Mounted Safety Frames
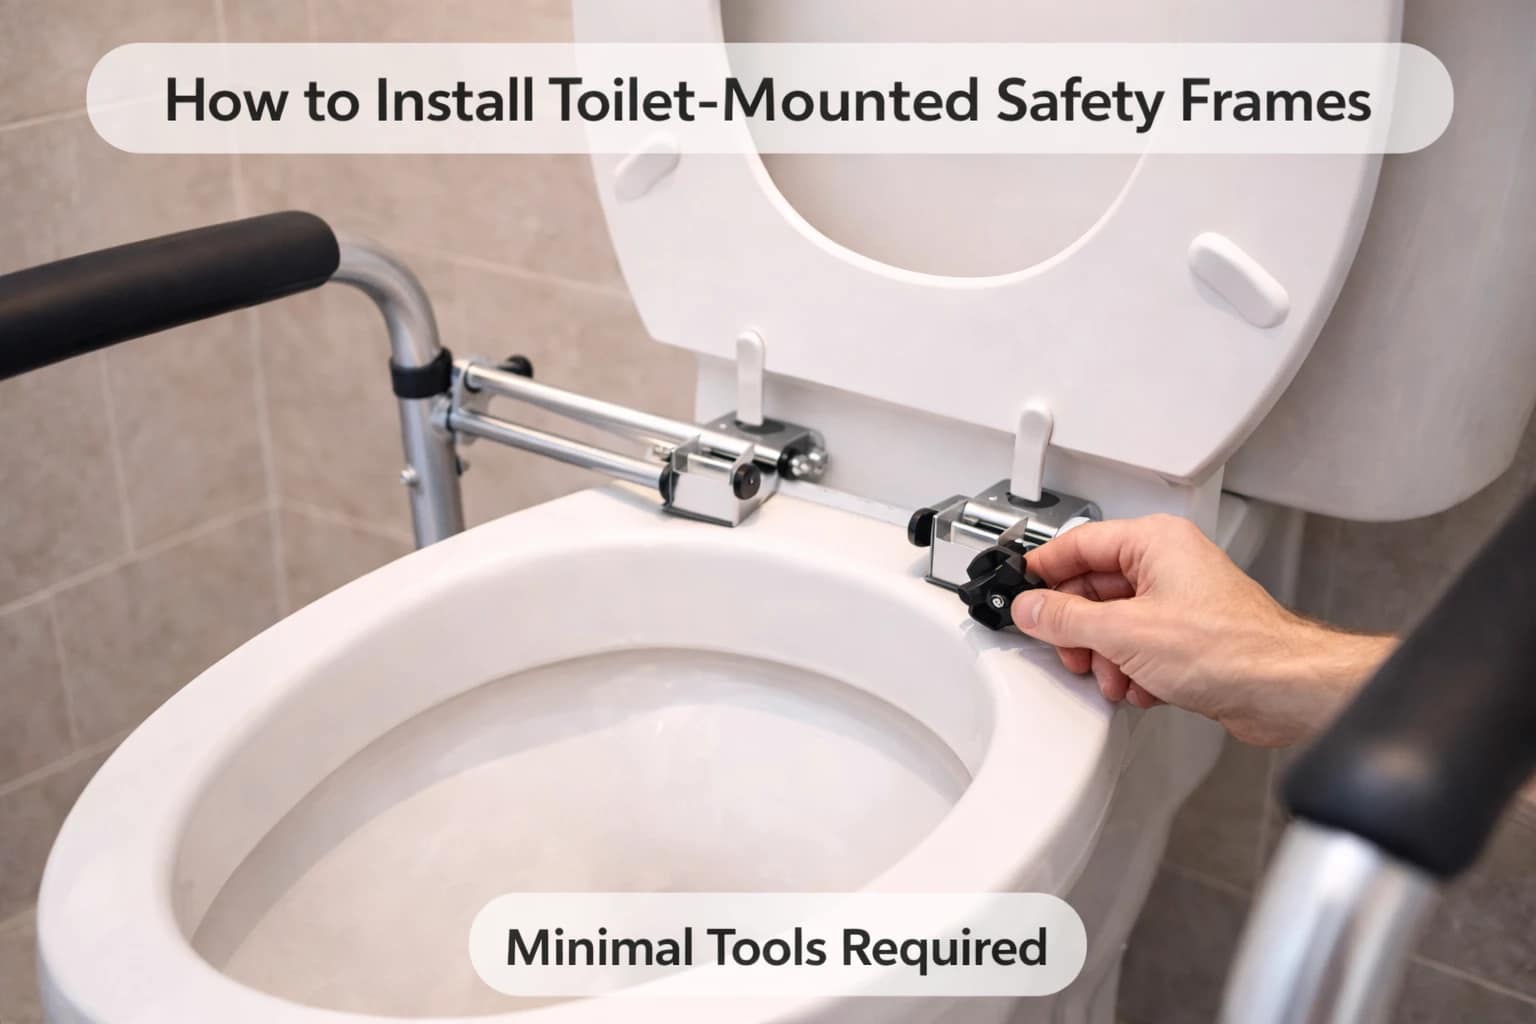
Some toilet safety frames attach directly to the toilet using the existing seat bolts.
Installation typically involves:
- Removing the toilet seat bolts
- Positioning the frame brackets under the seat hinges
- Reinstalling the seat bolts through the frame brackets
- Tightening the bolts securely
This style reduces floor footprint and works well in tighter bathrooms.
However, installation may require basic tools such as a wrench or screwdriver.
Common Installation Mistakes to Avoid
Although installation is simple, a few common mistakes can reduce stability.
Setting the Frame Too Narrow
If the armrests are too close together, sitting down may feel cramped and uncomfortable.
Leave enough space for natural movement.
Ignoring Floor Stability
Frames must sit evenly on the floor.
If the floor is uneven, rubber feet may not make full contact with the surface, which can cause slight shifting.
Always test each leg individually.
Skipping the Stability Test
Before daily use, apply gentle body weight to both armrests to confirm the frame feels secure.
This small test helps identify adjustments that may still be needed.
Do You Need Tools to Install a Toilet Safety Frame?
Most freestanding toilet safety frames require no tools.
They typically use:
- Push-button adjustment holes
- Locking pins
- Preinstalled bolts
Some heavier-duty models may include bolts for additional reinforcement, but most everyday frames rely on tool-free adjustment mechanisms.
Toilet-mounted frames may require a simple wrench or screwdriver when reinstalling the toilet seat bolts.
Overall, installation is far simpler than installing wall-mounted grab bars.
What I Recommend
When installing a toilet safety frame, focus on three key things:
- Proper height adjustment
- Stable contact with the floor
- Comfortable spacing between armrests
If those three factors are correct, the frame should feel secure and easy to use.
If you’re still deciding which model to choose, you can explore our guide to toilet safety frames for seniors to compare reliable options.
Final Thoughts
Installing a toilet safety frame usually takes only a few minutes, but those few minutes can make a big difference in everyday safety.
Once properly assembled and adjusted, the frame should feel stable, comfortable, and easy to rely on during sitting and standing.
For seniors with reduced balance or mobility, that extra support can significantly reduce the risk of bathroom falls.
FAQ
Q: How long does it take to install a toilet safety frame?
Most models can be assembled and installed in about 10–20 minutes.
Q: Can you install a toilet safety frame without tools?
Yes. Most freestanding frames use tool-free adjustment pins and push-button mechanisms.
Q: Are toilet safety frames difficult to assemble?
No. Most designs are straightforward and require only basic assembly before placement around the toilet.
Q: Do toilet safety frames need to be attached to the toilet?
Not always. Many models are freestanding and simply rest on the floor.