
Bathrooms are one of the most common places where falls occur, especially for seniors. Wet surfaces, hard fixtures, and frequent movement can create risks that are not always obvious.
Everyday actions such as stepping into the shower, turning, or standing up from the toilet can become difficult when balance or strength changes. The data on senior bathroom falls provides useful context for why these everyday movements matter. A grab bar placement diagram helps identify where support is most useful, making it easier to plan a safer bathroom layout and avoid common installation mistakes.
Disclosure: As an Amazon Associate, I earn from qualifying purchases. This post may contain affiliate links. If you purchase through these links, I may earn a small commission at no extra cost to you. I only recommend products I would feel comfortable using in my own home. Learn more.
On This Page
Quick Answer
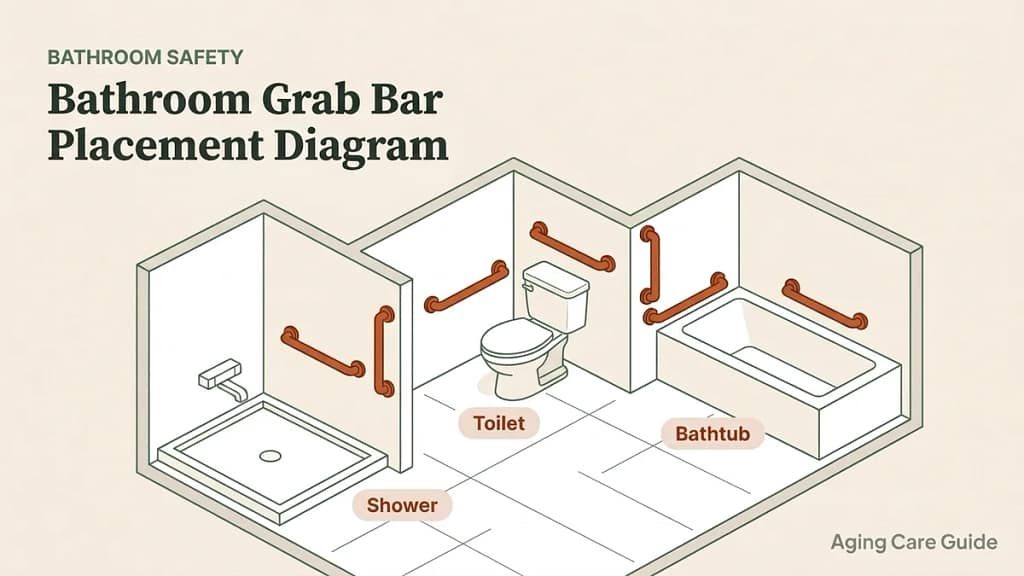
A grab bar placement diagram illustrates the recommended locations for installing grab bars in showers, bathtubs, and near toilets to improve balance and prevent falls.
Most diagrams highlight:
- shower entry support bars
- side-wall balance bars inside the shower
- toilet-side support bars
These visual guides make it easier to identify where support is most needed during everyday bathroom movements and how a proper grab bar placement diagram should be interpreted.
In most bathrooms, a grab bar placement diagram focuses on the shower, toilet, and bathtub areas because these are where balance support is most critical.
To understand how many bars are typically included in these layouts, see how many grab bars a bathroom needs.
How to read the diagram:
Start with the transition points first—shower entry, bathtub entry, and the area beside the toilet—because these are where support is usually needed most.
Then look at where the hand would naturally reach during stepping, turning, or standing up. If a bar looks correct in the diagram but would require stretching or twisting in real use, that placement may not be the best fit.
Shower Grab Bar Layout
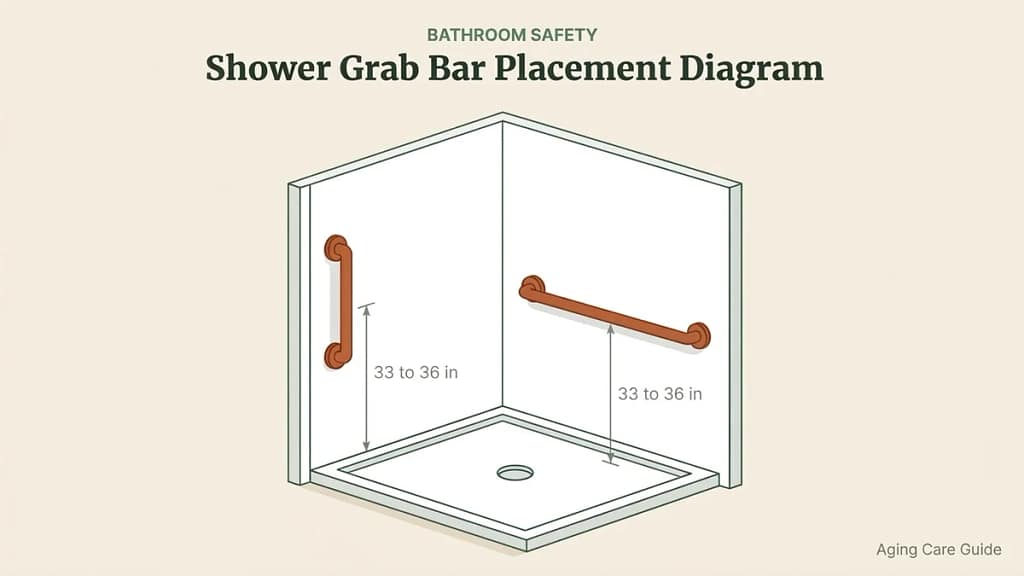
Showers are one of the most common places where grab bars are installed because wet surfaces increase the risk of slipping.
A typical layout shown in a grab bar placement diagram includes two key support areas.
Entrance support bar
A vertical bar near the shower entrance helps stabilize the body while stepping in or out. This placement allows users to grip the bar at different heights and provides immediate support during the transition into the shower.
Side wall balance bar
A horizontal grab bar along the wall where a person stands helps maintain balance while washing or turning. This bar often becomes the primary support point when shifting weight or adjusting stance.
Some bathroom layouts include both vertical and horizontal grab bars inside the shower. The vertical bar near the entrance helps stabilize the body during entry and exit, while the horizontal bar along the side wall provides balance while standing or turning.
Example:
A person stepping into a wet shower may first steady themselves on the vertical entry bar, then shift to the horizontal side-wall bar once fully inside. That creates a more natural support path than expecting one grab bar to handle entry, turning, and standing balance all at once.
In larger showers, installing two support bars often makes movement feel more natural because users can shift their grip as they move. This can make the shower feel safer and more comfortable during everyday use.
For a deeper explanation of these placements, you can review where to place grab bars in a shower.
Toilet Grab Bar Layout
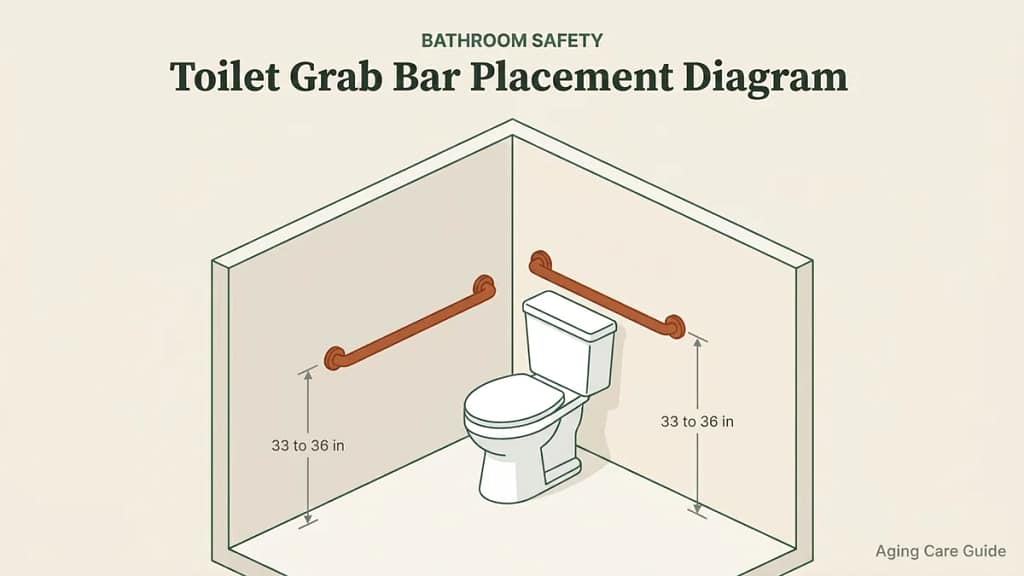
Standing up from a toilet requires a surprising amount of balance and strength. Grab bars near the toilet can significantly reduce the effort needed for this movement.
Two key support placements are commonly shown in bathroom safety layouts.
Side wall support bar
Installed beside the toilet, this bar provides leverage when sitting down or standing up. The user can push against the bar to assist with upward movement.
Rear support bar
Sometimes placed behind the toilet to provide additional stability during position changes or balance adjustments.
Placement near the toilet is especially important because standing up requires both balance and upward force. A well-placed support bar allows the user to push upward while maintaining stability at the same time.
Example:
A person may feel reasonably steady while walking but still struggle most during the push up from the toilet. In that situation, a side-wall bar placed within natural reach often provides more everyday support than a bar positioned farther away that looks correct on paper but is harder to use in the moment.
In many bathrooms, the side wall bar becomes the most frequently used support point in the entire room because it helps during both sitting and standing movements.
If you’re planning support near the toilet area, reviewing where to install grab bars around a toilet can help determine the safest positioning.
Bathtub Grab Bar Layout
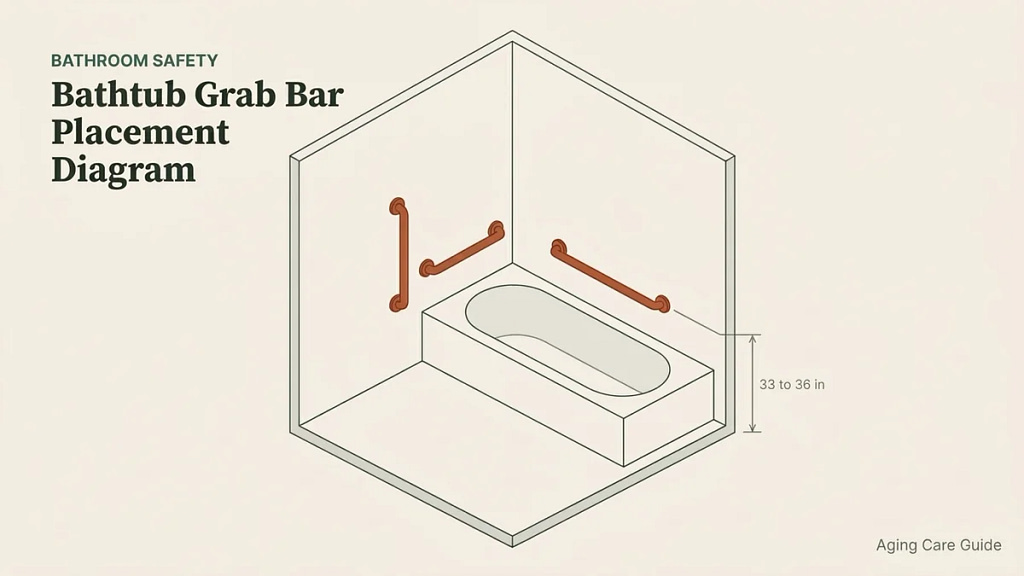
Bathtubs often require additional support because stepping over the tub wall can be one of the most difficult movements in the bathroom.
Most standard bathtub layouts include two primary support bars: an entry bar and an inside wall balance bar. In some bathrooms, a third vertical transition bar may be installed near the entry to provide additional grip options.
Entry support bar
Installed near the front edge of the tub to help stabilize the body while stepping in.
Inside wall balance bar
Placed along the wall inside the tub or shower area to assist with balance while bathing.
Vertical transition bar
Sometimes installed near the entry point to provide flexible grip height during movement.
If you are deciding between these orientations, this guide on vertical vs horizontal grab bars explains when each type provides better support during different bathroom movements.
These placements help support the transition between standing outside the tub and stepping inside safely.
Example:
Someone stepping over a bathtub wall may first use the entry bar to steady themselves during the step in, then rely on the inside wall bar once weight shifts fully into the tub. That sequence makes the support feel more continuous and controlled than relying on a single grab point for the entire movement.
In many bathrooms, this combination works best because it supports both the step over the tub wall and the balance adjustment that happens immediately afterward.
These bars pair well with a seated setup too. If a shower chair is going in the tub alongside them, chair fit and tub compatibility is worth checking before you drill.
Recommended Grab Bars for Different Support Needs
BEST FOR SIDE-WALL SUPPORT
Moen 24-Inch Stainless Steel Grab Bar
It provides a longer, continuous handhold for maintaining balance while standing, turning, or moving along the side wall of a shower or bathtub.
- 24-inch length provides a longer continuous handhold
- Supports up to 500 lb when installed in a stud or with SecureMount
- ADA-compliant stainless steel construction
- Concealed mounting screws for a cleaner look
BEST FOR MULTIPLE SUPPORT POINTS
FANHAO 16-Inch Grab Bars (2 Pack)
It’s a practical choice when the bathroom layout calls for grab bars at more than one location, such as separate support points in a shower or around a bathtub.
- Includes two 16-inch grab bars
- Knurled anti-slip grip helps provide a more secure hold
- Made from 304 stainless steel
- Supports up to 500 lb
BEST FOR TOILET-SIDE SUPPORT
Moen 16-Inch Designer Grab Bar
It’s a good fit for a compact support point beside the toilet, where limited wall space calls for a shorter grab bar to provide a secure handhold when sitting down or standing up.
- 16-inch length works well in more compact support areas
- Supports up to 500 lb when installed in a stud or with SecureMount
- ADA-compliant stainless steel construction
- Concealed screws and a brushed nickel finish for a cleaner appearance
Recommended Grab Bar Height
A grab bar placement diagram usually includes recommended height ranges so the bars are comfortable to reach.
Most installations follow a common guideline:
33–36 inches from the floor
This height generally aligns with the natural hand position for most adults when standing.
However, height may be adjusted depending on:
- user height
- mobility needs
- whether the shower includes seating
For a more detailed breakdown, see grab bar placement height guidelines.
Why Placement Diagrams Are Helpful
A grab bar placement diagram is most helpful when you are trying to decide where support will actually make movement safer, not just where a bar can physically fit on the wall.
Instead of treating every bathroom the same, the diagram helps you match grab bar locations to specific movements such as stepping into the shower, turning inside the tub, or pushing up from the toilet.
Benefits include:
- easier planning before installation
- safer placement decisions
- improved balance support
- reduced risk of falls
These diagrams are especially helpful when designing bathrooms for seniors or individuals with limited mobility.
They are also useful when planning installations before drilling into the wall. By reviewing a diagram first, homeowners can visualize how grab bars will support real movements such as stepping into the shower or standing up from the toilet.
This extra planning step helps ensure grab bars are installed where they align with natural movement patterns, making them more likely to be used effectively during everyday activities.
Common Grab Bar Placement Mistakes to Avoid
Even with a diagram, incorrect placement can reduce effectiveness or create new risks.
- Placing grab bars too far from natural reach zones
- Installing bars too high or too low for comfortable use
- Relying only on one bar for multiple movements
- Ignoring entry and transition points
How to sanity-check the placement:
Before drilling, imagine the exact movement the bar is meant to support. If reaching for it would require stretching, twisting, or shifting balance first, the placement probably needs adjustment.
A grab bar should always be positioned where the hand naturally reaches during movement. If reaching requires stretching or adjusting posture, the placement may not provide effective support.
If you want a deeper breakdown of installation and placement errors, reviewing common grab bar installation mistakes can help identify issues that are often overlooked.
What I Recommend
When planning grab bar installation in a bathroom, the most effective approach is to focus first on the areas where slips most often occur.
This typically includes:
- the shower entrance
- the shower side wall
- the wall beside the toilet
Installing grab bars in these locations already covers most balance challenges.
More importantly, each bar should be:
- securely mounted into wall studs whenever possible
- positioned where the hand naturally reaches
- installed at a comfortable height
Placement and secure mounting work together to ensure grab bars provide real support.
In most cases, following a simple grab bar placement diagram that covers the shower entry, side wall, and toilet area is enough to significantly improve bathroom safety.
FAQ
What is a grab bar placement diagram?
A grab bar placement diagram is a visual guide that shows recommended locations for installing grab bars in showers, bathtubs, and near toilets.
Where should grab bars be placed in a shower?
Grab bars are typically installed near the shower entrance and along the side wall where a person stands.
What height should grab bars be installed?
Most grab bars are installed between 33 and 36 inches from the floor, although height may vary depending on the user.
Do bathrooms need multiple grab bars?
Many bathrooms benefit from having grab bars in multiple locations, especially inside the shower and beside the toilet.
Are placement diagrams based on safety guidelines?
Yes. Many bathroom safety diagrams follow accessibility recommendations and common safety guidelines used in accessible bathroom design.
Can one grab bar placement diagram work for every bathroom?
No. A diagram shows common support zones, but the final placement should still match the bathroom layout, the user’s height, and the movements that feel most difficult in real use.
Should grab bar placement change if there is a shower seat or bench?
Often, yes. A seated user may need support at a different height and in different positions than someone who stands for the full shower, so placement should reflect how the space is actually used.
Final Thoughts
Using a grab bar placement diagram makes it much easier to plan safe and effective support in a bathroom.
These visual guides help identify the exact locations where grab bars provide the most benefit during everyday movements such as entering a shower or standing up from a toilet.
When combined with proper installation and secure mounting, well-placed grab bars can significantly reduce the risk of slips and falls.
Even a simple diagram can improve decision-making and help ensure that grab bars are placed where they will actually be used when support is needed.
