Installing grab bars is one of the most effective ways to improve bathroom safety. They provide a stable support point when stepping into the shower, standing up from the toilet, or maintaining balance on slippery surfaces.
However, many people hesitate to install grab bars when their bathroom walls are covered in tile. Tile can crack easily if drilled incorrectly, and mistakes during installation can damage the wall.
The good news is that learning how to install grab bars in tile is completely manageable when the correct tools and techniques are used.
Understanding how to install grab bars in tile safely helps ensure the grab bar is both secure and properly positioned.
Disclosure: As an Amazon Associate, I earn from qualifying purchases. This post may contain affiliate links. If you purchase through these links, I may earn a small commission at no extra cost to you. I only recommend products I would feel comfortable using in my own home. Learn more.
Quick Answer: How to Install Grab Bars in Tile
To install grab bars in tile, drill through the tile using a carbide or diamond drill bit, then secure the grab bar into wall studs or heavy-duty wall anchors designed for grab bars.
Basic steps for installing grab bars in tile:
- Mark the grab bar position
- Drill pilot holes through the tile using a tile drill bit
- Locate wall studs when possible
- Install screws or heavy-duty wall anchors
- Secure the grab bar tightly to the wall
Taking your time while drilling is the most important step. Rushing the process can crack the tile or damage the wall behind it.
Tools Needed to Install Grab Bars in Tile
Before starting installation, gather the necessary tools.
Common tools include:
- drill with variable speed
- carbide or diamond tile drill bit
- stud finder
- level
- pencil or masking tape for marking
- screwdriver or socket wrench
- silicone sealant
Tile drill bits are designed to cut through ceramic or porcelain without cracking the surface.
Using the correct drill bit is essential for safe installation.
Step-by-Step: How to Install Grab Bars in Tile
The following steps explain how to install grab bars in tile safely without cracking the surface.
Step 1: Choose the Correct Placement
Before drilling any holes, decide where the grab bar should be installed.
Grab bars are commonly placed:
- near shower entrances
- along shower walls
- beside the toilet
- near bathroom entrances
Proper placement ensures the bar provides support exactly where balance is needed.
If you’re unsure about positioning, reviewing where to install grab bars in a bathroom can help identify the most useful locations.
Step 2: Mark the Mounting Holes
Hold the grab bar against the wall in the desired position.
Use a level to make sure the bar is straight.
Mark the mounting holes using a pencil or masking tape.
Taking time during this step helps prevent drilling mistakes later.
Step 3: Locate Wall Studs
Whenever possible, grab bars should be mounted directly into wall studs.
Stud mounting provides the strongest support because the screws anchor into the wall framing.
Use a stud finder to check whether studs are located behind the tile.
If you can align the grab bar with studs, the installation will be significantly stronger.
For detailed instructions on stud mounting, reviewing how to install grab bars in studs can help ensure the grab bar is secured correctly.
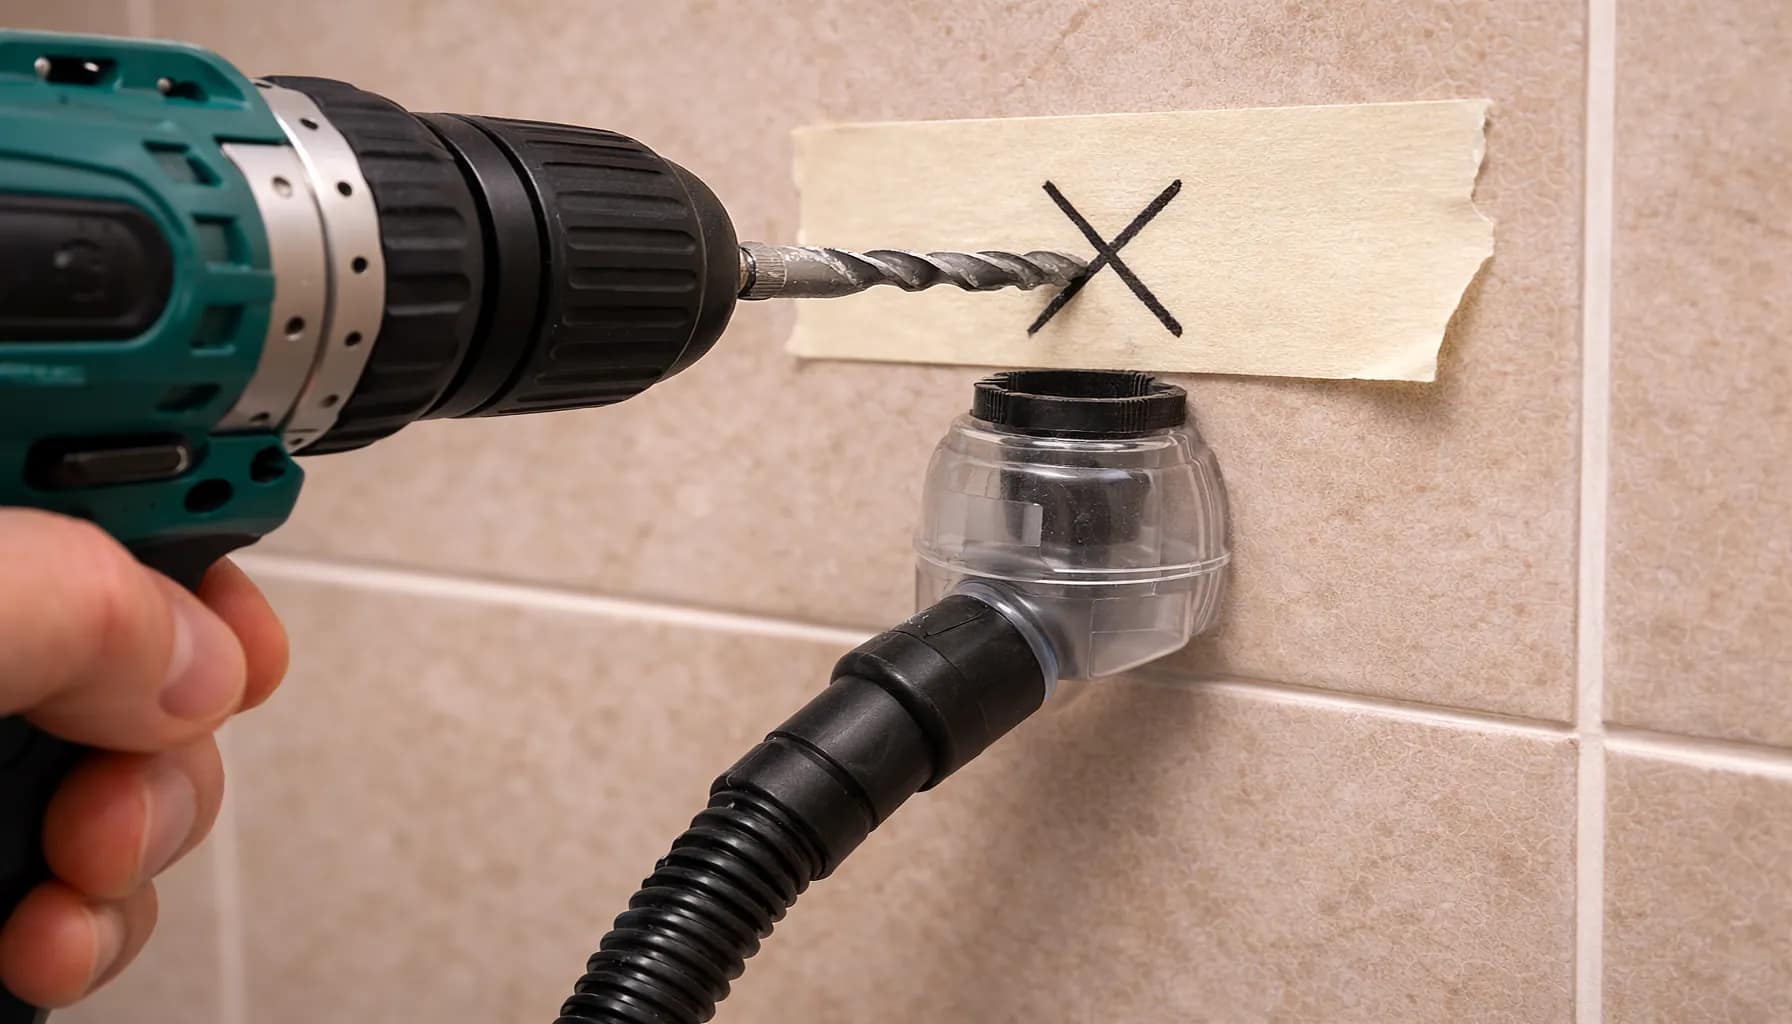
Step 4: Drill Through the Tile Carefully
Drilling tile requires patience.
Place masking tape over the drill location to help prevent the drill bit from slipping.
Use a low drill speed and apply steady pressure while drilling.
Allow the drill bit to slowly grind through the tile instead of forcing it.
Once the tile layer is drilled, continue drilling into the wall material behind it.
This step is where most installation mistakes happen, so work slowly to avoid cracking the tile.
Step 5: Install Anchors or Stud Screws
If a stud is located behind the hole, install heavy-duty screws directly into the stud.
If studs are not available, install wall anchors designed for grab bar mounting.
Some bathrooms require anchors because stud locations do not align with the desired grab bar position.
If you’re dealing with that situation, it may help to review can grab bars be installed without studs to understand safe mounting alternatives.
Step 6: Secure the Grab Bar
Once the mounting hardware is installed, attach the grab bar to the wall.
Tighten all screws securely, but avoid overtightening.
Overtightening can damage the tile or mounting hardware.
After installation, apply a small bead of silicone sealant around the mounting plate to prevent moisture from entering the wall.
Common Mistakes When Installing Grab Bars in Tile
Installing grab bars in tile is straightforward when done correctly, but several common mistakes can cause problems.
Examples include:
Drilling too quickly
Fast drilling can crack the tile surface.
Using the wrong drill bit
Standard drill bits are not designed for tile and may damage the surface.
Skipping stud alignment
Anchoring into studs provides the strongest installation.
Poor positioning
Grab bars must be placed where they provide real support.
Learning about common grab bar installation mistakes can help prevent these issues before they occur.
What I Recommend
If I were installing grab bars in a tiled shower or bathroom wall, I would focus on two things: proper placement and secure mounting.
Start by choosing locations where balance support is actually needed.
Then check whether studs are available behind the tile.
If studs align with the desired placement, installing the grab bar directly into studs is the safest option.
If studs are not available, use heavy-duty anchors specifically designed for grab bars.
Taking the time to drill carefully and secure the hardware properly will ensure the grab bar remains stable for years.
Final Thoughts
Learning how to install grab bars in tile properly may seem intimidating at first, but the process becomes manageable when the correct tools and steps are used.
The most important factors are careful drilling and strong mounting.
Whenever possible, installing grab bars into wall studs provides the safest support.
When studs are not available, heavy-duty anchors can provide an alternative solution when installed correctly.
With proper installation, grab bars can significantly improve bathroom safety and reduce the risk of slips and falls.
FAQ
Q: Can you drill through tile to install grab bars?
A: Yes. Grab bars can be installed through tile using carbide or diamond drill bits designed for tile surfaces.
Q: Do grab bars in tile need to be installed into studs?
A: Installing grab bars into studs is the safest option, but heavy-duty wall anchors can sometimes be used when studs are not available.
Q: What drill bit should be used for tile?
A: Carbide or diamond-tipped drill bits are commonly used for drilling through ceramic or porcelain tile.
Q: Will drilling tile crack it?
A: Tile can crack if drilled too quickly or with the wrong bit. Using slow speed and proper drill bits helps prevent damage.
Q: Should grab bars be sealed after installation?
A: Yes. Applying silicone sealant around the mounting plates helps prevent water from entering the wall.